July 28, 2010

Hooded Towel

The other day I reorganized my craft spot and came across several projects that I had all of the supplies for but I hadn't started yet.  This motivated me to kick it into gear and de-craft my craft room.  One of the first projects I tackled was the hooded towel for my son.   I know, I'm probably the last person in blogland to actually make my own hooded towel but here it is anyways!
My son doesn't have a career in modeling in his future.  I think I took over 20 different photos and this was the best I could do!

This is the entire towel from the backside.  I made a cut little dimple in the back.  Ignore the toe! 
Close up of the dimple in the back.

This was taken from the inside of the towel.  


 I used a tutorial that had a lining so I could hide the seams.  I just used the other half of the hand towel for the lining.

The cutest part.....look at those ears!

I used several different tutorials to help come up with my own version.
Little Birdie Secrets (Basic Hooded Towel)
Infarrantly Creative (Dimple in the back of the towel)
Break It Down Sewing & Design (Lining/Seamless)
Oopsey Daisy (Ears)

July 8, 2010

Inexpensive Bithday Party

This project isn't mine to share, but I couldn't resist. One of my very good friends threw an awesome Toy Story birthday party for her little 2 year old boy. I loved how much she was able to do on a very tiny budget!
First she got the idea for this shirt here, but she wanted to make something for him to wear to his birthday party. It's so cute! She already had the red shirt so she just zipped over to the local thrift store and found yellow and blue t-shirts for $1 a piece. She did have to buy some matching thread so the whole project ended up costing her < $4. Not 2 bad, right?

She also had another a great idea for an activity for the kiddos. The kids decorated paper bag vests (so they could be cowboys and cowgirls like Woody and Jessy)This cost her $2! She had the paper bags and crayons, she just bought two sheets of stickers at the dollar store. AND the hats and scarves were loaned from a dance teacher (with lots of costumes and props). The kids had so much fun dressing up like cowboys and cowgirls!

The kids also got to take several whacks at this...I made this cereal box pinata which cost me $0. I had everything on hand (cereal boxes, tissue paper from past presents, elmer's glue, printer paper, 1 plastic sheet protector, crepe paper, and duct tape) I think my friend did spend about $10 on pinata filler stuff (she filled it with green army guys (dollar store), toy story fruit snacks, some candy, and sheriff badges (dollar store) )

With the new Toy Story 3 movie out and VERY popular, just thought I'd share some ideas for any of you that might have some birthdays to plan for this summer!

July 7, 2010

Infant Hair Bows & Headbands

About three months ago I welcomed a new niece into my family.  Of course, I had to make her some bows since I just have a little boy and I've never taken the opportunity to learn how to make bows.  My sister-in-law is not into big flashy pink bows that cover most of the babies head so I had to be creative and do a lot of internet searching to come up with the perfect simple bow for her.  
I followed the basic how-to of small bow making but then played with different versions to make them unique.  
Some of the ribbon I found at fabric & craft stores or at Walmart but I got most of my ribbon off of Ebay.  I was able to get a wide variety of colors and design and quantity within my budget.  I now have so much ribbon that I'm constantly looking for projects to use it with.  I even tied some in my hair for the 4th of July!
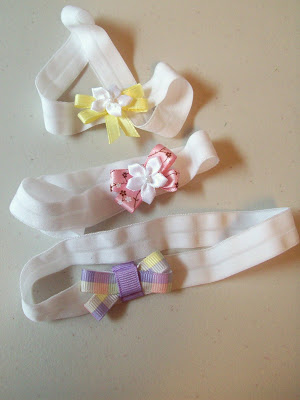
Some of the bows I matched with specific outfits that my niece had.  


I tried to incorporate some buttons into the bows but I never was very happy with how they turned out.  


The most recent successful experiment was making a knot in the middle of the bow.  It added a new element to the simple bows.  
Another thing I discovered on my search was fold-over elastic.  I used it to make the headbands.  I could only find this online and got mine on ebay.  It is extremely soft and stretchy elastic that lays smoothly on the baby's head.  I just hot glued the ends together and then had ribbon wrapped around to hide the seam.  It comes in a wide variety of colors as well.
I've seen the white flowers at fabric stores near the ribbon.  I think they add a nice sophisticated touch to the bows.  
This final headband/bow is my absolute favorite.  Unfortunately, I can't take credit for it all.  
My sister-in-law bought a headband similar to this one and decided that it wouldn't be hard to duplicate.  She took two pieces of white ribbon and sewed them together on both edges.  She then put thin elastic through the openings of the ribbon and cinched up the ribbon.  I then sewed the ribbon together with both seams facing one way.  I then took one of the white flowers and carefully looped the purple ribbon around it and held it in place with hot glue over the seam edges to hide the seam.
I can see myself making several of these in the future.  Now I just need my own little girl to wear them!  

A few of the websites that I've used frequently to help make my bows are:
Posh n Pretty (Basic Bow)
Paper Seed (Basic Bow)
Girly Things (Wide Variety of Bows)
My Tiny Sweet Cheeks (How to cinch bow in the middle)
Little Millie & Me (Fold-Over Elastic)
These are just a few of the many tutorial that are out there.  If you have questions about any bows or headbands that I've done feel free to leave me a comment and I'll get back to you.