May 12, 2010

Picture Blocks and Letter Rice Bags

(Sorry about the picture quality.  I've tried long enough to fix it!)
My nephew just turned three and I had the hardest time coming up with something to make him for his birthday.  Finally, I came across the project from Somewhat Simple where she put a picture on one side of nine different cubes.  Perfect!
  I saw these ABC blocks for $2 at Michaels and thought they would be perfect for this project since my nephew is learning his letters and words.I only used 4 of the sides to keep the letters showing.  I got 4 pictures that were taken over the the past 3 years.
All I did was cut the picture down into the sizes I needed (kind of tricky!)  I then used mod podge to glue on each picture.  Finally, sand down the edges a little and finish with a coat of mod podge on top. 
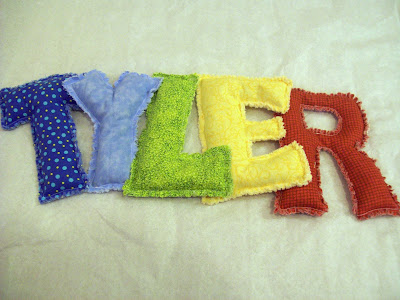
The second gift I did was make some letters that spelled his name.  Janelle did a similar project HERE.  The difference with mine is I used cotton fabric so the edges would fray.
I just traced out my own pattern for the letters and then used that to cut my fabric.  Make sure you don't make my mistake of not making part of the letter wide enough. If you look closely, my letter R is a little light on the rice in the middle!  After sewing the wrong sides together with a 1.5 inch gap, I washed and dried them to make them fray.  I then filled them with rice and then closed up the whole.  

May 5, 2010

Mother's Day Wordle

Since my husband would just give his mom a phone call and call it good for Mother's Day it was my job to come up with something to make for her.  This is what I came up with this year...
  I used the website, Wordle to make the word collage in the middle.  I just added a touch of ribbon to bring some of the color out.  So simple and perfect.

Some tricks to using Wordle if you haven't used it already:
  1. Type your words in a Word document first and then copy and paste into Wordle. (It doesn't save your list.)  
  2. The more times a word is in the list the larger it will be.  So I wanted the words, "We Love You" to stand out more so I had those multiple times on my list.  
  3. If you want a phrase like, "We Love You" you need to put curvy dashes in between. (I don't know what they're called.  Ex. we~love~you.
  4. It prints out very large so on your printer settings you can change the size.  Instead of it set on the default of 8.5 x11 I moved it to 5x7 and set the paper to face profile.  It then fit my 5x7 frame perfectly.
  5. For me it printed darker then it showed on the computer screen so make your color choices a little lighter to get the perfect colors.  
  6. Finally, prepare to spend a lot of time with it because it took me FOREVER to decide on the perfect font, colors, and layout.   At least it took ME forever maybe you will be better at making decisions!

May 3, 2010

Simple Tutu

I wanted to learn how to make tutus and since I've been hanging out with my niece this last week, I finally had a great excuse to do it. I started off with tulle from JoAnns...and the only colors they had were light pink and light blue. It came out like this...

Cute, but not as cute as I thought it should be....

So, I went to Roberts and perused the wedding isle to find bright pink and purple tulle and matching ribbon and flowers. Much brighter and much more fun, right? It came out like this...


The second time around, I snipped the ends in a `v` or `w` shape to make it look more pixie-ish, added ribbon (between every 2 knots), and sewed some flowers on by hand. This is typically a "no-sew" project, but you can sew on extra frilly stuff if you want to!

Found this great tutorial on how to make a cute tutu here. ITS VERY SIMPLE and once you figure out how it works, I would encourage you to break the mold, experiment, do something different and new, and have fun with it!