July 7, 2010

Infant Hair Bows & Headbands

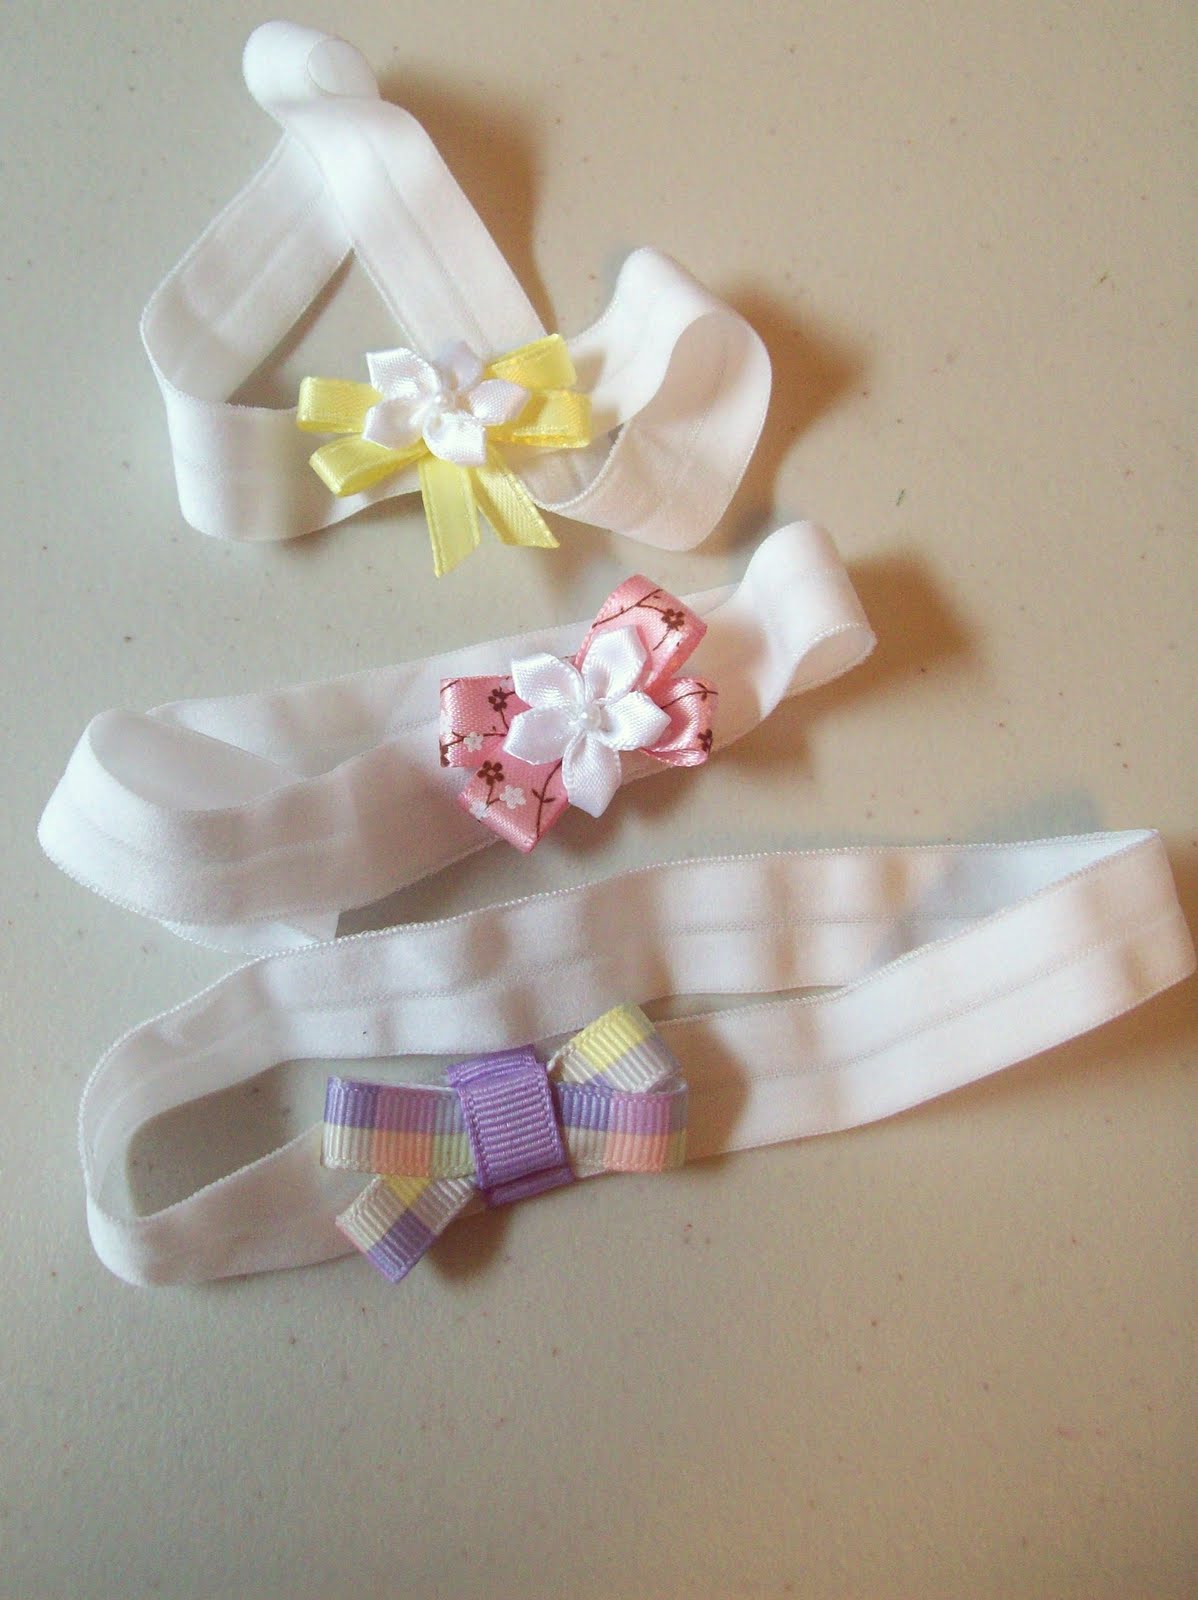
About three months ago I welcomed a new niece into my family.  Of course, I had to make her some bows since I just have a little boy and I've never taken the opportunity to learn how to make bows.  My sister-in-law is not into big flashy pink bows that cover most of the babies head so I had to be creative and do a lot of internet searching to come up with the perfect simple bow for her.  
I followed the basic how-to of small bow making but then played with different versions to make them unique.  
Some of the ribbon I found at fabric & craft stores or at Walmart but I got most of my ribbon off of Ebay.  I was able to get a wide variety of colors and design and quantity within my budget.  I now have so much ribbon that I'm constantly looking for projects to use it with.  I even tied some in my hair for the 4th of July!
Some of the bows I matched with specific outfits that my niece had.  


I tried to incorporate some buttons into the bows but I never was very happy with how they turned out.  


The most recent successful experiment was making a knot in the middle of the bow.  It added a new element to the simple bows.  
Another thing I discovered on my search was fold-over elastic.  I used it to make the headbands.  I could only find this online and got mine on ebay.  It is extremely soft and stretchy elastic that lays smoothly on the baby's head.  I just hot glued the ends together and then had ribbon wrapped around to hide the seam.  It comes in a wide variety of colors as well.
I've seen the white flowers at fabric stores near the ribbon.  I think they add a nice sophisticated touch to the bows.  
This final headband/bow is my absolute favorite.  Unfortunately, I can't take credit for it all.  
My sister-in-law bought a headband similar to this one and decided that it wouldn't be hard to duplicate.  She took two pieces of white ribbon and sewed them together on both edges.  She then put thin elastic through the openings of the ribbon and cinched up the ribbon.  I then sewed the ribbon together with both seams facing one way.  I then took one of the white flowers and carefully looped the purple ribbon around it and held it in place with hot glue over the seam edges to hide the seam.
I can see myself making several of these in the future.  Now I just need my own little girl to wear them!  

A few of the websites that I've used frequently to help make my bows are:
Posh n Pretty (Basic Bow)
Paper Seed (Basic Bow)
Girly Things (Wide Variety of Bows)
My Tiny Sweet Cheeks (How to cinch bow in the middle)
Little Millie & Me (Fold-Over Elastic)
These are just a few of the many tutorial that are out there.  If you have questions about any bows or headbands that I've done feel free to leave me a comment and I'll get back to you.  

June 30, 2010

Foam Bath Fun

One night, while I was giving my son a bath, he just sat in the water and would splash a little but nothing else.  Those of you with a little toddler boy know that something isn't right if a little boy isn't getting into mischief, making a mess, or creating a ton of noise!  I looked into the tub at the bath toys and quickly realized the problem.  Poor kid has been playing with the same exact toys since he has been able to sit up in the tub!  

My solution to the problem.............FOAM!
 For the dress up figure, I used my scrap booking template called TracerKins (EK Success used to make them but I don't think they do anymore.)  The templates have all sorts of different cloths, hair, and accessories.  I will eventually cut out more and draw faces on the "doll" to make it more fun to dress up.  (I know I have a boy but they still enjoy dressing things up.  Most guys won't admit it but they probably dressed up a doll or wanted too at least once in their life!)
For the letters, I just traced them out with a stencil.  You could also print letters from the computer to get the exact size and shape you wanted.  This project did make me yearn for a Cricut Machine that much more!  Can you cut foam out with a Cricut Cutter? Now I need to make some numbers and if I get REALLY ambitious (or my son gets bored again) I'll cut out a shape to go with the letter.
This fun project and activity for bath time didn't cost me more than 50 cents and I have a lot left over.  This would make a great gift!

June 21, 2010

Finished Product

Hey, Keri deserves the credit for this project! I'm just the one who volunteered our services. Did we know what we were doing? We may have been winging it, but it was SO MUCH FUN! I was able to leave my husband and son for most of 2 whole days to hang out and sew with my best friend. Would I do it again? YOU BETCHA! Thanks for all of your creativity and help Ker! You are amazing!

June 14, 2010

Bridesmaid Dress

This past week, I had the opportunity to visit my family the same time my friend Mandy and co-author was visiting hers.  While we were shopping, Mandy ran into an old friend that was getting married in a few days and couldn't find bridesmaid outfits that matched her colors.  Mandy being the generous and giving person she is, volunteered our skills in sewing to solve the dilemma. 

We first found a cute and simple pattern from New Look 6975, then found fabric as close to the brides colors as possible (trust me these colors were tricky especially in a town with very limited fabric selection options!), and finally found some beads to draw the outfit together.   
We went with elastic for the waistband instead of a zipper because of our limited time and also we didn't have the exact measurements from the bridesmaids.  The pattern was simple and fairly easy to follow (are they every REALLY easy?)  We were also able to modify the pattern without problems for different sizes.
The necklaces were a headache at first.  We tried to do it several different ways until we settled on this style.  I love how they turned out and once we figured out what we were going to do, it only took a few minutes to make.  Just cut two pieces of ribbon the same length and tie a knot in the middle of each one.  Then, thread a needle and tie a knot on the end. Next, push the needle through one of the knots of ribbon and then through the string of beads and finally through the second knot of ribbon.  Tie another knot in the string to finish it off.  We left the ribbon long and untied at the ends so it could hang down the back of their necks.
To complete the outfit we picked up a very cute shirt at Maurices.   The entire outfit ended up being around $30 to complete. So, yet again, the skills of sewing have come to the rescue! 

May 12, 2010

Picture Blocks and Letter Rice Bags

(Sorry about the picture quality.  I've tried long enough to fix it!)
My nephew just turned three and I had the hardest time coming up with something to make him for his birthday.  Finally, I came across the project from Somewhat Simple where she put a picture on one side of nine different cubes.  Perfect!
  I saw these ABC blocks for $2 at Michaels and thought they would be perfect for this project since my nephew is learning his letters and words.I only used 4 of the sides to keep the letters showing.  I got 4 pictures that were taken over the the past 3 years.
All I did was cut the picture down into the sizes I needed (kind of tricky!)  I then used mod podge to glue on each picture.  Finally, sand down the edges a little and finish with a coat of mod podge on top. 
The second gift I did was make some letters that spelled his name.  Janelle did a similar project HERE.  The difference with mine is I used cotton fabric so the edges would fray.
I just traced out my own pattern for the letters and then used that to cut my fabric.  Make sure you don't make my mistake of not making part of the letter wide enough. If you look closely, my letter R is a little light on the rice in the middle!  After sewing the wrong sides together with a 1.5 inch gap, I washed and dried them to make them fray.  I then filled them with rice and then closed up the whole.  

May 5, 2010

Mother's Day Wordle

Since my husband would just give his mom a phone call and call it good for Mother's Day it was my job to come up with something to make for her.  This is what I came up with this year...
  I used the website, Wordle to make the word collage in the middle.  I just added a touch of ribbon to bring some of the color out.  So simple and perfect.

Some tricks to using Wordle if you haven't used it already:
  1. Type your words in a Word document first and then copy and paste into Wordle. (It doesn't save your list.)  
  2. The more times a word is in the list the larger it will be.  So I wanted the words, "We Love You" to stand out more so I had those multiple times on my list.  
  3. If you want a phrase like, "We Love You" you need to put curvy dashes in between. (I don't know what they're called.  Ex. we~love~you.
  4. It prints out very large so on your printer settings you can change the size.  Instead of it set on the default of 8.5 x11 I moved it to 5x7 and set the paper to face profile.  It then fit my 5x7 frame perfectly.
  5. For me it printed darker then it showed on the computer screen so make your color choices a little lighter to get the perfect colors.  
  6. Finally, prepare to spend a lot of time with it because it took me FOREVER to decide on the perfect font, colors, and layout.   At least it took ME forever maybe you will be better at making decisions!

May 3, 2010

Simple Tutu

I wanted to learn how to make tutus and since I've been hanging out with my niece this last week, I finally had a great excuse to do it. I started off with tulle from JoAnns...and the only colors they had were light pink and light blue. It came out like this...

Cute, but not as cute as I thought it should be....

So, I went to Roberts and perused the wedding isle to find bright pink and purple tulle and matching ribbon and flowers. Much brighter and much more fun, right? It came out like this...


The second time around, I snipped the ends in a `v` or `w` shape to make it look more pixie-ish, added ribbon (between every 2 knots), and sewed some flowers on by hand. This is typically a "no-sew" project, but you can sew on extra frilly stuff if you want to!

Found this great tutorial on how to make a cute tutu here. ITS VERY SIMPLE and once you figure out how it works, I would encourage you to break the mold, experiment, do something different and new, and have fun with it!

April 23, 2010

Simple Personalized Flannel Blanket

A friend of mine is having some complications with her pregnancy and I felt like I should do something to help.  I attempted to make two different batches of cookies that both didn't turn out so I went with the basics....a flannel blanket.
Double Sided Flannel Blankets are really a frugal gift and very simple except for getting the fabric to match up.  You can see at the bottom of mine that it bunched up a little.  Oops!  Oh well!!  To make these you need at least 1 yard of flannel for the top and one for the bottom.  I think it looks best when you get contrasting fabric but ones that still matches in some way.  (The pink had the green dots on it.)  Cut the flannel so they are equal and straight, matching up the edges.  I just used some I already had so mine isn't a square.  For swaddling it is best to use a square shape.
If you would like to put lettering or a design on the blanket skip to the bottom.  If you want a plain blanket keep following directions. 

When the edges are matched up, sew all the way around the edges with the rights sides together.  Leave a 4 inch hole for turning the blanket right side out.  Before flipping the fabric right side out, trim down the corners to give them a sharper point.  Make sure to not trim the seam.  After the blanket is flipped, push the corners out until they are square and press the edges flat with an iron.  Finally, stitch around the edge of the blanket catching the seams from the hole.  You can use a decorative stitch to give the edges a fancy twist.  That's it!
First, I printed out lettering from the computer font that I wanted in the size I wanted. Cut them out and trace them backwards onto some Heat-n-Bond or similar brand.  Iron the adhesive with the textured side onto the wrong side of the fabric with the paper side facing you.  Follow the manufactures directions to attach the adhesive and fabric.  Cut the adhesive and fabric out, following the trace lines.  Then, peel the paper off and iron the fabric letters onto where you want them.  Finally, sew a straight line or zig zag on the edge to hold them in place.  To get some pictures with these steps look at my Rag Quilt Tutorial.  After you've finished with the letters continue with the directions above.  

April 16, 2010

Rag Quilt Tutorial

My son has recently become very attached to his rag quilt so I knew it was time to make another one.   I used 1 yard of 4 different kinds of flannel, white thread, heat-n-bond, spring scissors and letters printed from the computer. 

To start out you need to cut your squares to 6x6.   
 I did 28 squares in each of the blue fabrics and 32 in each of the green fabrics.


Sew two squares together with an X with the wrong sides together.  Then sew 4 squares together to form a square, keeping all of the seams on one side with a 1/2 inch seam allowance. 

I then printed out lettering from the computer font that I wanted in the size I wanted.  My letters were no larger then 7x7.

Take some heat-n-bond or another brand and trace the letters onto the paper side of the adhesive.  Cut around the letters.  
Iron the adhesive with the textured side on the wrong side of the fabric and the paper side away from the fabric and follow the manufactures instructions.  
Cut the fabric letters out, following your trace line.

Then take some contrasting fabric and made a square around the letters.  Just large enough to fit each letter. Then appliqué the letter onto the square and sew around the outside of the letter with a straight stitch.  You can also do a zig zag stitch but with the straight stitch it lets the letter fray a little and that is what we are going for with a rag quilt.  Then sew close to the edge of the square with the letter already attached onto the seamless side of a four square square. 
I went ahead and sewed the 4 letter 4 squares together in one strip with an empty one in front of the letter A square. (The fifth plain 4-square isn't showing in this picture.)
I put together the final two rows of squares switching off the starting squares colors.  (Sorry about the missing picture but look at the top to see the pattern I used.)  After the main body of the quilt is sewn together I started with the two edges.  (The only reason why I didn't do just another row is 4 squares is because I ran out of the blue poke-a-dot fabric because I'd used some of it for another project.  You can simplify this quilt by added another row of squares.  You would need 8 of each green squares and 12 of each blue square.)
For the edges you need eight pieces cut 8x8,
eight pieces cut 5x8,

eight pieces of 1 3/4x8,
eight pieces of 2 1/4x8 and,
the the final four pieces you need to cut 25.5x8.

(Sorry for the lack of pictures.)  Sew two wrong pieces together like earlier with an X.  With the long piece, I did a criss cross across.  Then sew the strip together with the long piece in the middle.  Finally, sew the two strips to each side of the main four square sections.

Then finish the edges by sewing a 1/2 inch seam around the edge.  Next, all of the seams need to be clipped.  I clipped every 1/4 inch on all of the seams and also the seams around the letters.  This part is messy and long and tedious.  Be prepared to have pieces of flannel all over and a cramped hand.  If you don't already have some this would be the time to invest in some spring scissors.
The final step is to wash the quilt a few times to help the seams fray.  Make sure you clean the lint trap of your dryer before and after you put the blanket in the dryer.
Ta-Da!  All done. 

If you have any questions don't hesitate to contact me.  I know there is some gaps in my tutorial so for some needed help go to these links:  


Making
The Girl Creative

